Showing posts with label before & after. Show all posts

Sunday, July 5, 2015

Vintage Pyrex - Mod Kitchen with Cradle

Mod Kitchen is one of my favorite Pyrex patterns.  Appeals to that part of me trained in commercial arts during that period of time when such graphics were popular.  I love hunting for Pyrex out in the thrift stores, and finding cradles is equally exciting.  A couple days ago I came upon a cradle for Mod Kitchen.  As most vintage cradles go, they don't look so great, so a clean up job was necessary.  Here she is with the dish.


Here are some before and after pictures of a rooster cradle I recently cleaned up.


Cork handles before and after a wipe down with a rag dampened with water.


I use a combination of BKF and 0000 steel wool for the metal.  The end result will depend on the condition of the cradle--some just never come back even after cleaning.  And they are not restored to their original condition, but can be much more visually appealing.


Friday, June 12, 2015

A Great Pyrex Find Week - Another Space Saver!


My Pyrex wishlist has become so narrow that I don't count on finding much of anything I really need to add to my collection.  There have been a couple space savers that have eluded me and I won't buy on line.  This week I pieced one together.  The lid first and then 6 days later the Musical Staff spacer saver dish.  Total cost, $3.79.  I couldn't be more pleased.

The space saver was coated in baked on gunk.  Here's a before and after. Both pieces are chip free and the most minor pin size paint loss on the corners of the dish.  I couldn't have asked for more.


Saturday, March 1, 2014

Some Vintage Finds, Easter Stuff and Dressing up the Kitsch Katcher

I've been trying to not buy so much at the thrifts lately as I have more than I practically need and I don't want to be overwhelmed by too much stuff.  I've been focusing more on Easter decorations both non-vintage and vintage (of course).  Here's what I got!


Not so old stuff included a couple strands of bunny and carrot lights, as well as eggs to decorate my Easter tree with.  I couldn't resist the Fill and Thrill plastic egg, the graphic is really cute.  Hubby says "fill her up!"  I stumbled upon the chenille chicks at the grocery store!

Hubby found this sweet Lefton Easter ceramic piece.  It's about 4" tall.  Not sure what to put in side of it, maybe a small floral frog and mini flower blossoms? We have fragrant violets blooming outside right now, that would be perfect!

 
I found this little ceramic bunny.  He has a hole in back and I stuck a pink cotton ball in it!

I was so excited to find this Relpo Halloween planter!  When I went to the register, the cashier said she put it out but thought about putting it away with seasonal stuff for next year.   I told her how glad I was she didn't!!!  This guy isn't easy to find and he is soooo cute!  I didn't find much at all in the way of vintage Halloween decorations last fall--this makes up for it.

Hubby found these two copper hand worked pictures by Wanda Irwin from Philip Irwin Co. (Inglewood, CA) dated 1955.  They are about 6.5"x 7.5".  I love them!!  I look for mid century wall art and seldom find the type of things I am attracted to.  These had me all over them.


Here is the second ceramic pillar candle holder marked Japan that I have found recently.  This one is small enough to fit on my kitsch katcher corner shelf I made last fall.  I took all the decorations and lights back off last month, and now I'm working on making it coordinate with our Danish modern mid century style family room.

Here's how it looked for the holidays...


...and here it is today, slowly coming together. Knowing me I'll be changing it--moving things around as I get new pieces.  It's fun to look for vintage kitsch for this corner. (I need a new nice light above it as well.)

I was cleaning my kitchen yesterday--time to get to that nook and cranny type cleaning.  I snapped this picture of one of my drawers...can you spot the Pyrex 501? (Really, now how can I write a post this long without mentioning Pyrex!!!?)

I'm a bit of a organization nut.  I managed to puzzle together the interior of this drawer with various containers. The 501 holds my rubber bands and shelf liner stuff I use to grip bottle tops.

And one more off topic picture...

 
My sleeping angel.  Of course--Mommy's chair is the best to nap in!

Linking up with Sir-Thrift-A-Lot at thriftasaurus!


Thursday, January 30, 2014

All Good Things in Time - Jewelry Box (Before and After)

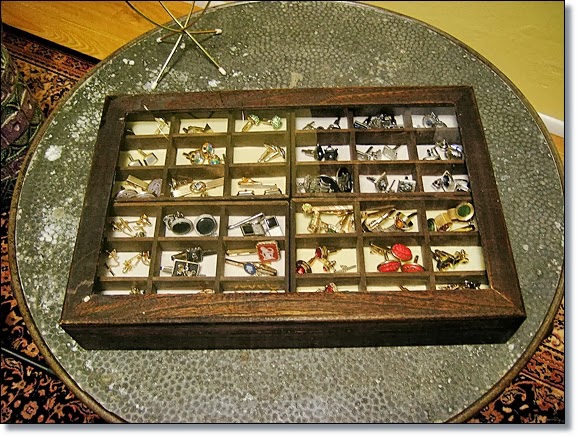
Thrifting isn't just all about find things is it?  There's the unloading, stacking/putting it somewhere, taking off price tags, washing/cleaning, putting away.  That is generally the very least of it.  Today I brought home one of those "project" things.  When we were at the thrift store, I showed hubby this find--it would be for him.  I said I would need to do this and that to it, he said "you sure you want to go through that" and I said, "well if you really want it, I don't mind doing it".  So here's what I got.

A dirty glass top jewelry showcase/display box.  Just what hubby needs for his vintage cufflinks and tie accessories.  I made him a tray to stick in the drawer of his little antique table from his grandmother, but he quickly outgrew that.  I didn't want to spend $30 or more for a new box, so he's been limping along.  But it's a pain, he has all these little boxes he has to go through in addition to the overflowing tray. 

There are 56 cells, that's a lot!  He has room to grow in this!  That's nice, I won't have to even think about it for a while.  Well, since I usually have more projects than I need going on, I decided to clean this up after supper.  I vacuumed it, cleaned the glass, wiped down all the wood with alcohol and scraped the edge along the glass where there was some excess stain.  Then I made templates to cut felt to line the cells.  I could only do the top, I don't have enough light colored felt to the bottom as well. 

Here it is.  I packed everything in the top tier though some things will be separated out once I get the lower tier felted.  I made some some trays beige and some white.  I sorted silver toned items into the white and gold toned into the beige.  It probably won't stay that way for long.

Another project down, another area of the house organized!  Oh and, it cost $3.50! 

Tuesday, January 14, 2014

Vintage Pixie Gets Bath and a New Set of Clothes!

After looking long and hard--I found a couple pixies on line.  These had all the things I was looking for in pixies, cheap(!), small and really sweet faces.  Here is one that I gave a bath and made a new set of clothes for.
Didn't measure this guy, but I think he's about 5" tall.  You can see how terribly faded and dirty he looked.  


Marks on his dirty little face.  


Off with his clothes!  Boy,his clothes sure were a different color way back when!


There was no way to remove his head from his body, so I had to cut away his sleeves.


Bath time...


Ah!  Much better!


Serious glue was used on the cap/his head.  Part of the fabric just wouldn't come off no matter how hard I tried.  I opted for filing it down with my wire wrapping files.  Then there was pattern making, felt cutting and voila!


He looks like a new man!  One more pic!


Ain't he cute!  I used a wool blend felt I had.  Wish I would have had woven wool felt, it would have been softer, but oh well, sometimes we have to settle with what we have on hand.  I also trimmed him up with some reclaimed vintage ric rac!  That was fun!

Friday, December 27, 2013

Finally Changing up the Pyrex Display

With all the holiday related things I needed to get done before Christmas, I didn't get around to changing my Pyrex to something new for Christmas time.  Since I finally parted with some of my pottery dishes, I was able to move the Franciscan Oasis into the upper cabinets.   I freed up the tambour door cabinet and moved the Pyrex off the peninsula counter into that cabinet.  That space is 24" deep and 36" wide and with a bamboo shelf set in there, it holds a lot!


Christmas Eve I just had to change it up!  I couldn't keep myself from doing it.  I was ready to see something different and snowflakes popped into my head so I pulled in all the turquoise.


It is so easy for both of us to access.  I can leave the door open or close it depending on my mood.  There is a light in back to illuminate it a night.  I'm glad I moved it to this spot.  And I'm glad I changed it out--how refreshing!


Thursday, December 12, 2013

Dressing up the Kitsch Katcher - Another Work in Progress

Today was another day of hiding from the snow and ice.  I was thinking about making an ornament wreath, but first I wanted to re-organzie my mini glass Christmas balls.  Well, one thing led to another and the wreath never happened.  Instead, I tended to my 'kitsch katcher' that I built early last month.  I've been throwing stuff on it just to get it put somewhere and it was time to actually 'decorate' it!


I used two old doors and hinged them together.  Primed it with a few coats of white and then attached a variety of shelves I had on hand.  Some were cheapies from Ikea, little wooden boxes, a myrtle wood  planter from the thrifts and so on.  Here's what it looks like today.


Unfortunately, it doesn't look nearly as nice in the picture as in person.


I still want to decorate the bottle brush trees, that is a project within itself.  I took a bunch of pictures of the goodies up close.  I have a bunch more Christmas kitsch, but this can only hold so much.

I've fallen in love with Christmas planters.  Here are a couple I decorated.  I look for plastic greenery at the the thrifts like the one in the Santa planter.  I stuffed one of those flocked dancing Santa's and a vintage bottle brush tree in this reindeer's sled. (I need a candle for the holder).


I intend on decorating this large bottle brush tree in this Santa's harp planter.


Instead of putting the Holt Howard candle hugging Santa on a candle, I let him hug a tree instead.  A little star on top would be cute!


I got a set of 3 Shiney Brite stenciled ornaments that are much too big for my tree or wreath making.  I hung them on my kitsch katcher and attached old plastic corsages to the tops.  The first one is so cute, there are two flocked red reindeer in the corsage!


Here are a couple of the Nutcrackers we have.  The one on the right is a Steinbach which I purchased (a long time ago) at the factory outlet in Germany the first year hubby and I were married.  Recently hubby has been finding vintage Erzgebirge from the GDR.  I found this white vintage bottle brush tree new in the package!  I'm going to put mini glass balls on it.


Cute little Lefton Santas with a vintage bottle brush tree marked Japan. Hubby found this Lennox Rudolph porcelain box, it's not vintage, but so well executed and so cute we couldn't pass it up.  Santa express with an elf on one side and Santa on the other is a piggy bank.


 And more cute stuff....


I am absolutely worn out.  I fought to get these images loaded, loader was being difficult.  I'll be fiddling with my shelf for a while--I'm sure!  On to a good nights rest, we may be able to go thrifting (and grocery shopping) tomorrow!

Monday, December 2, 2013

Vintage Chenille Bump Stems

I saw this flower arrangement at the thrift store for a few weeks now I'm sure.  No one wanted that poor dirty and partially faded arrangement made of chenille bump stems and plastic foliage, no one but me that is.  I got the side eye from hubby on this one, but he'll feel differently later--trust me!

There are red and white flowers, a few stems of white fern gone tan, two sprigs of some white stuff with gold flecks on them, two stems of holly and four stems of some green tuft.  Like most things, they just don't make it like they used to and that includes chenille stems.  Since I had a 20% off coupon in my wallet, I decided this would be the day that I take this arrangement home.  In my eyes, it was a pot of crafting goodies!

I washed up all the plastic stuff, easy enough.  I wasn't sure what might happen to the chenille.  I disassembled one of the white flowers and soaked one piece/petal in warm water with oxygen bleach.  I rinsed it and laid it over a foliage stem so that the water flowed downward.  After letting it air dry for a while, I used the hair dryer to further dry it.  I will let it sit over night and then use a clean toothbrush to fluff it up.  Here's a comparison to before washing and after.

Several of the petals have gold tinsel in the stem!  I didn't realize it until I washed it--what a great surprise! 

Yes, I'm am going to take all the chenille apart and wash it and use it in future vintage projects!  It is tedious, but I have that kind of patience.


Friday, November 15, 2013

Vintage Cardboard Christmas Music Box Fix Up

I picked up this cute vintage music box made in Japan the other day.  It needed a little TLC.  Looked like the cat chewed on the chimney, the roof had some paint loss, the mica was faint and the felt base dirty.  Something is missing from the chimney base.  I found one on Etsy--I wanted to find out what the missing object was, but there was no embellishment on it at all.  Here's the before picture.


Here is the music box as I found it.  Poor chimney--I had to remove the chenille trim, it was mangled.

A little paint brightened up the roof and an application of fresh mica created greater color contrast.  I removed the chenille trim on the chimney, painted the exposed brown cardboard, added pipe cleaner and applied mica.  I used a piece of the mangled chenille to prop up the awning and added mica.  The felt base is very dirty around the outer edge, so I applied mica over the top to freshen it up.


I don't know what is missing from the chimney base.  I decided to mica the top of an old vintage mercury ball and place it where the missing object was.

This little gem cost more than I thought it should for the condition it was in--but then again, we know, I like a deal!  But I'm glad I didn't pass this up, it's just darling!

(Hubby is also glad I bought it though initially he had his doubts.)